For the best image quality, this is done during installation and should be done periodically by the customer. It is accessed with the "Settings" as follows.
Settings -> Machine Features Settings -> Maintenance -> Auto Color Calibration

- When you set the adjustment sheet on the exposure glass, put about 10 pieces of white paper on the adjustment sheet in order for the original to contact the exposure glass sufficiently. Instruct the customer to periodically execute the ACC.
Description | |
|---|---|
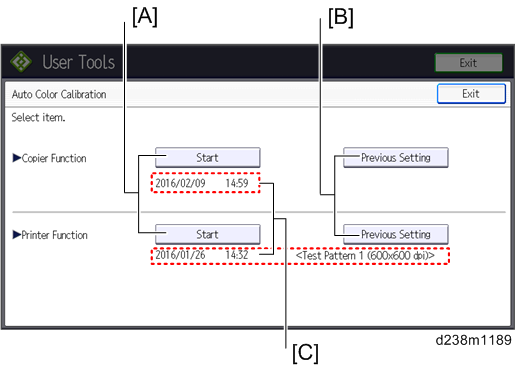
[A] | Output adjustment sheets. You must execute both for copy and printer functions. |
[B] | Roll back to the previous value. |
[C] | Displays the last date/time ACC was executed. |
About the printer ACC
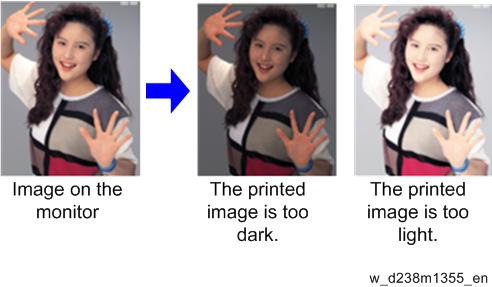
It is difficult to keep constant printing density due to the environment of the machine, individual differences between devices, and the passage of time. The printer ACC reads the current printing density using the scanner, and then compares the result with the time when it was in a normal state, and makes the printing density close to the normal state.
Issues possibly solved by the printer ACC
- When the printed image looks strongly red, blue, or yellow because the density of the cyan, magenta, and yellow are not balanced.

- When the printed image looks too dark or light.
Issues cannot be solved by the printer ACC
The tone differences from other types of machine or machines of other manufacturers cannot be solved by the printer ACC. The tone differences from the machines of other manufactures occur due to the differences in color reproduction caused by the difference in the engine and color profile specifications so it may not be solved even after performing the printer ACC.
Refer to "Adjustment by Changing the Machine’s Profile Setting" for the color tone differences from the other types of the machine.