Be sure to execute color registration and auto color calibration when installing the machine.
Color Registration
- Press [Settings] on the HOME screen.
- Press [Machine Features Settings] > [Maintenance] > [Color Registration].
- Press [OK].

- After the adjustment is complete, press [Exit].
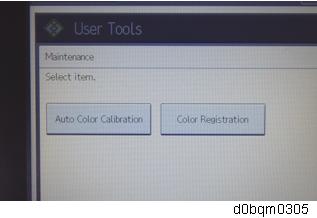
Auto Color Calibration (ACC)
Do the "Auto Color Calibration (ACC)" for the copier mode & printer mode as follows:
- Copier mode -
- Press [Settings] on the HOME screen.
- Press [Machine Features Settings] > [Maintenance] > [Auto Color Calibration]
- Press [Start] for Copier Function.
Press [Start Printing] to print the test pattern.
- Clean the exposure glass.
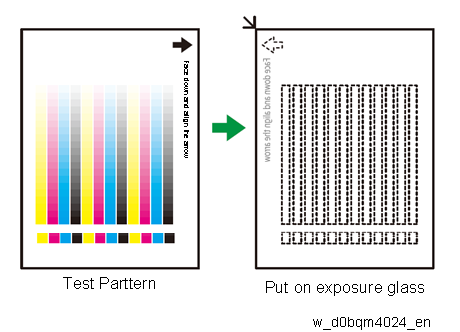
- Put the test pattern on the exposure glass.
- Put 10 sheets of white paper on the test chart. This ensures the precise ACC adjustment.
- Close the SPDF/ARDF or the platen cover.
- Press [Start Scanning].
The machine starts the ACC.
- Printer mode -
- Then, Press [Start] for Printer Function.
Press [Start Printing] to print the test pattern.
Press [Quick Test Pattern], then press [Start Printing] to print the test pattern.
The test pattern is printed after self-checking.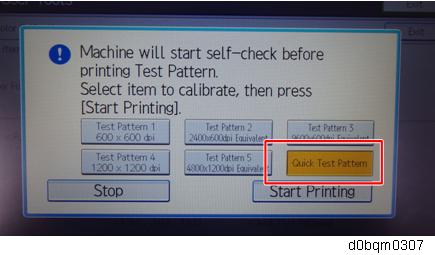
- Put the printout on the exposure glass.
- Put 10 sheets of white paper on the test chart. This ensures the precise ACC adjustment.
- Close the SPDF/ARDF or the platen cover.
- Press [Start Scanning].
The machine starts the ACC. Confirm that the execution result is displayed.
For the Quick Test Pattern, the execution result is recorded with all resolutions (patterns 1 to 5).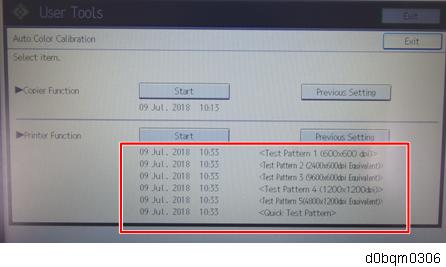

- If the printed image is not adjusted properly after executing Quick Mode, perform ACC with normal mode (test pattern in applicable resolution) again.