Specify ARFU settings as required.
Operating Conditions:
- Use the machine in an environment where it can be connected to the Internet.

- Auto remote firmware update (ARFU) requires a connection to an external network. Be sure to get permission from the customer before setting ARFU up.
- The connection is one-way, so the user’s data will not be accessed from the global server.
Pre-Operation Set Up and Checks
- Check the network settings (IP address, Subnet mask, Gateway, and DNS).
- Check the proxy settings.
- In the environment to execute ARFU, check that the machine’s main power is always turned on and it is always connected to the Internet.
This condition is required for downloading the firmware package in the background and also for updating the firmware by ARFU when the machine is turned ON for the first time at machine installation. - Check the time (day of the week and time) to prohibit the execution of ARFU.

- If the access to the external server is restricted, request the network administrator (customer) to permit the following FQDN name for communication.
- FQDN: p-rfu-ds2.support.ricoh.com
Configuration Procedure
In "Settings" icon > Machine Features Settings > System Settings > Interface Settings, specify the IP address, Subnet, Gateway, and DNS settings according to the user’s network environment.
- Make sure to specify the DNS settings. To acquire the firmware data, it is necessary to have the hostname resolved so that access to the global server is possible using the hostname.
- Check the user’s network environment and, as required, specify the proxy server settings in the following SPs:
- SP5-819-062 (Use Proxy DFU(SSP))
1: Use / 0: Not use - SP5-816-063 (Use Proxy DFU(SSP))
- SP5-816-064 (Proxy Port Number)
- SP5-816-065 (Proxy User Name)
- SP5-816-066 (Proxy Password)
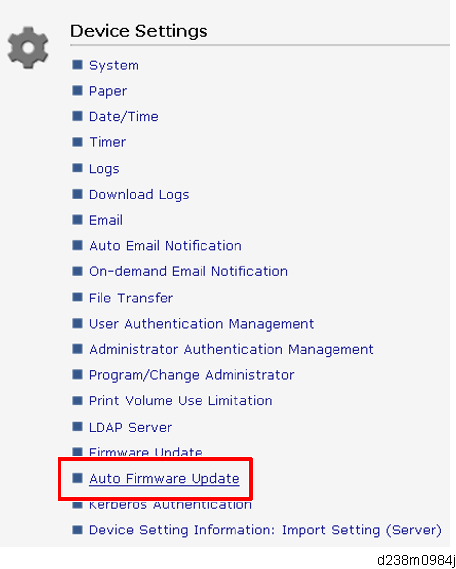
They can be specified also via Web Image Monitor, from Device Management>Configuration>Device Setting>Auto Firmware Update. (However, "Auto Firmware Update" appears on Web Image Monitor only if the ARFU function is set to "ON".)
- SP5-819-062 (Use Proxy DFU(SSP))
Set SP5-886-111(AutoUpdateSetting) to "1(ON)"
- To download the firmware only using SFU, and not by ARFU, specify the settings as follows:
- SP5-886-111(AutoUpdateSetting) to "0 (OFF)"
- Set SP5-886-115 (SfuAutoDownloadSetting) to "1 (ON)"
- To download the firmware only using SFU, and not by ARFU, specify the settings as follows:
- When setting the prohibited day, time and so on of the auto firmware update, set them with following SPs, or Web Image Monitor.
- SP5-886-112 (AutoUpdateProhibitTermSetting)
0: OFF, 1: ON (Default ) - SP5-886-113 (AutoUpdateProhibitStartHour)
Default: 9 - SP5-886-114 (AutoUpdateProhibitEndHour)
Default: 17 - SP5-886-120 (AutoUpdateProhibitDayOfWeekSetting)
Default: 0x00
Set the bits for the days of the week to prohibit updating.
Prohibited (Monday - Sunday): Bit 7
Monday: bit 6
Tuesday: bit 5
Wednesday: bit 4
Thursday: bit 3
Friday: bit 2
Saturday: bit 1
Sunday: bit 0
e.g.) Prohibited on Mon., Fri., Sat., and Sun.: 0x47 (01000111)
- SP5-886-112 (AutoUpdateProhibitTermSetting)
- Use the machine with its main power and connected to the Internet.
Specifying the Times and Days of the Week to Prohibit Updating via Web Image Monitor
- Start the Web Image Monitor.
- Log in as the machine administrator.
- Point to [Device Management], and then click [Configuration].
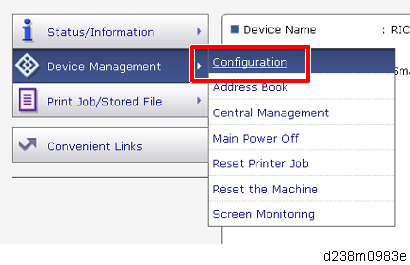
- Click "Auto Firmware Update".
- In the applicable items, specify the times and days of the week to prohibit updating.
Select the check boxes of the applicable days of the week to prohibit updating on that day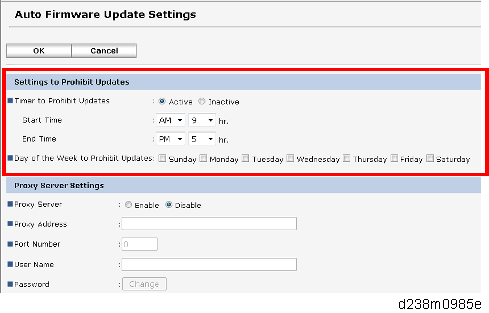
Checking the ARFU Connection
- Enter the SP mode.
- Press [Firmware update].
- Press [Update].
- Press [Execute update].
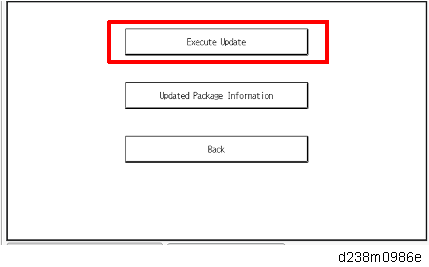
- ”Execute update” appears even if @Remote connection has not been established.
If an error code appears when you click “Execute update”, the machine is in the following status.
Error code
Status
E51
The machine in operation for printing, etc.
E71
Network connection error
- Check if one of the following messages appears: "Will you download the latest package Ver *** and update?" or "The installed package is the latest version.".
- If the message appears, it is possible to execute ARFU.
->Press “No” and close SP mode to complete the configuration. - If the message does not appear, it is not possible to execute ARFU.
->Check the network settings again.
- If the message appears, it is possible to execute ARFU.
- SP5-886-116 (Auto Update Prohibit Term Setting) displays the scheduled date and time of the next ARFU.
- If the scheduled date and time of the next ARFU coincides with a time and day of the week when ARFU is prohibited, the machine sends an inquiry to the server to check if there is a new firmware package at this time. If there is a new firmware package, it is downloaded in the background, but the package updating is canceled and executed on the next occasion, 76 hours later, to update the package.
Checking the ARFU Result
Checking the Result from the Firmware Update Setting
- Enter the SP mode.
- Press [Firmware update].
- Press [Update].
- Press [Update Package Information].
- If the firmware package is the same as the one on the global server, the update was completed successfully. Otherwise, check the result using the logging data.
In SP7-520-041 to -045 (Update Log: Auto:Version), you can check the versions of the packages updated by ARFU. (-041 displays the latest result. It is also printed on the SMC sheet.)
Checking the Result Using the Logging Data
- Enter the SP mode.
- Press [System/Copy].
- Check the results for ARFU by SP7-520-051 to 060 (Update Log: Auto:Result)
"-051" is the latest update result. For details about the number of each result log, see Firmware Update (Auto Remote Firmware Update).